
리본을 설명하기 앞서 로드 밸런싱에 대해서 이해하고 가겠습니다.
어떤 어플리케이션이 다른 어플리케이션을 호출할 때 대상 어플리케이션 인스턴스가 하나밖에 없다면 어떻게 될까요 ?
그 대상앱 인스턴스가 죽거나 HTTP hang이 걸리면 서비스에 장애가 발생합니다.
그래서 보통 어플리케이션 인스턴스는 1개가 아니라 최소 2개 이상을 띄웁니다.
2개의 인스턴스에 요청을 나눠주는 친구가 로드밸런서, 요청을 나눠주는 행위를 로드 밸런싱이라고 합니다.
Client LoadBalancer - Ribbon
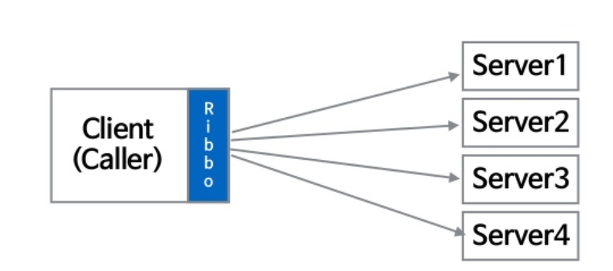
Ribbon은 Load balancing을 요청 어플리케이션 단에서 수행해주는 Client-side Load balancer
Ribbon과 같은 L/B가 필요한 이유는 부하 분산을 적절하게 하여 서비스의 가용성을 최대화하기 위함입니다.
API Gateway도 Ribbon을 통해 Backend service를 로드밸런싱합니다.
Ribbon을 사용하면 API Gateway없이 대상 어플리케이션을 직접 로드밸런싱하여 연결할 수도 있습니다.
여러 로드밸런싱 방법(라우드 로빈, 최소 연결 등)을 지원
설정을 통해서 재시도 정책을 구현 할 수 있다.
실습
실습은 hytrix가 적용된 프로젝트에 ribbon을 추가한 부분으로 향후 유레카를 적용하면 보다 더 편하게 사용할 수 있는 부분은 다음 유레카 포스팅에서 다루도록 하겠습니다.
1. 의존성
...

ext['springCloudVersion'] = 'Finchley.SR2'

...

dependencies {
    compile('org.springframework.retry:spring-retry:1.2.2.RELEASE')  // spring cloud requires spring-retry for auto-retry
    compile('org.springframework.cloud:spring-cloud-starter-netflix-ribbon')  // 2. To use ribbon
    compile('org.springframework.cloud:spring-cloud-starter-netflix-hystrix') // 1. To use spring-cloud-hystrix
    ...
}

dependencyManagement {
    imports {
        mavenBom "org.springframework.cloud:spring-cloud-dependencies:${springCloudVersion}"
    }
}
2. yml을 이용한 설정
리본의 각종 설정추가적인 설정의 아래 공식 사이트 참조
https://github.com/Netflix/ribbon/wiki/Getting-Started#the-properties-file-sample-clientproperties
product: # 서비스 이름
  ribbon: # 리본 등록
    listOfServers: localhost:8082,localhost:7777 # 해당 서비스 URI 목록
    MaxAutoRetries: 0 # 같은 서버에 재시도 횟수
    MaxAutoRetriesNextServer: 1 # 재시도를 시도할 서버 개수
3. 기본 설정 적용
restTemplate에 @LoadBalanced 어노테이션으로 리본 listOfServers로 등록된 서버로 로드 밸런싱을 진행
@SpringBootApplication
@EnableCircuitBreaker
public class DisplayApplication {

    @Bean
    @LoadBalanced
    public RestTemplate restTemplate() {
        return new RestTemplate();
    }

    public static void main(String[] args) {
        SpringApplication.run(DisplayApplication.class);
    }
}
4. 리본 사용
기존 url을 적는 곳에 서비스 이름으로 대체하면 끝
@Service
public class ProductRemoteServiceImpl implements ProductRemoteService {

    private static final String url = "http://product/products/"; // 서비스 이름으로 대체
    private final RestTemplate restTemplate;

    public ProductRemoteServiceImpl(RestTemplate restTemplate) {
        this.restTemplate = restTemplate;
    }

    @Override
    @HystrixCommand(commandKey = "productInfo", fallbackMethod = "getProductInfoFallback")
    public String getProductInfo(String productId) {
        return this.restTemplate.getForObject(url + productId, String.class);
    }

    public String getProductInfoFallback(String productId, Throwable t) {
        System.out.println("t = " + t);
        return "[ this product is sold out ]";
    }
}
Reference
'Spring Cloud' 카테고리의 다른 글
| 6. Spring Cloud Config (0) | 2021.06.20 |
|---|---|
| 5. zuul - [Spring Cloud를 활용한 MSA 기초 온라인 강의 실습] (0) | 2021.06.18 |
| 4. Feign - [Spring Cloud를 활용한 MSA 기초 온라인 강의 실습] (0) | 2021.06.17 |
| 3. Eureka - [Spring Cloud를 활용한 MSA 기초 온라인 강의 실습] (0) | 2021.06.16 |
| 1. hystrix - [Spring Cloud를 활용한 MSA 기초 온라인 강의 실습] (0) | 2021.06.13 |